Fish at Fishing Shoals (🐟 markers on the world map). Each shoal has a fish type, level (1–5), remaining supply and a timer. Based on the official Pawtato Fishing docs. Fisherman's Hut →
Find 🐟 shoal markers on the map — each has type, level, supply and timer.
Shoal rules
Shoals are temporary — they vanish when the timer runs out or supply hits zero.
After a shoal disappears, that spot has a 9-hour cooldown before a new one can appear.
Shoals are shared — busy spots deplete faster; check supply and expiry first.
Level 1 shoals start with 1000 supply; level 2 shoals have 500.
How to fish
Buy a Basic Fishing Rod at the Fisherman's Hut (optional: Fishing License or Golden License — without one you get 10 free catches per day).
Equip the rod in Main Hand — needs Durability (1 per attempt, win or lose).
Zoom in on the map, click a 🐟 shoal and check level + supply.
With a Hero selected, press Start Fishing.
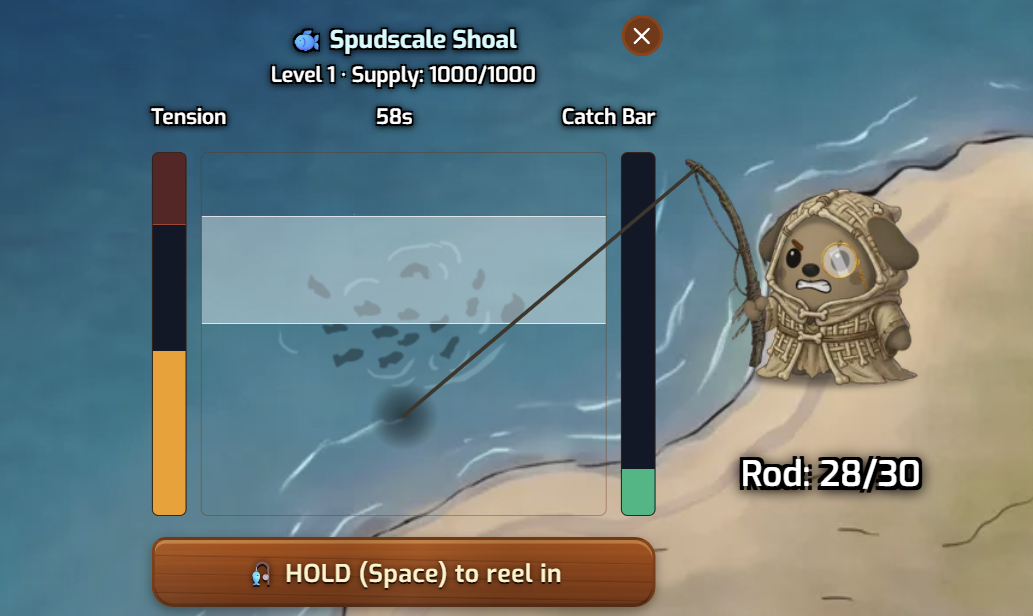
Hold to reel (click, spacebar or on-screen button) — keep your bracket on the fish, fill the Catch bar to 100% within 45s (level 2: 30s), and avoid Tension at 0% or 100%.
Collect the catch automatically; Fish Again to continue at the same shoal.
Fishing licenses
License
Cost
Daily limit
Validity
None
Free
10 fish / day
Unlimited
Fishing License
100 TATO
25 fish / day
14 days
Golden Fishing License
1000 TATO
100 fish / day
14 days
Fishing License — 25 fish/day.
Golden License — 100 fish/day.
Shoal loot
Base fish rates are fixed per shoal. Rare catches (everything except the base fish) scale with Hero Luck — each LCK point multiplies the rare chance by 1% (effective = base × (1 + LCK ÷ 100), e.g. Axoma Lurker at 1.5% base and 1 LCK → 1.5% × 1.01 = 1.515%). Bait can target specific fish.
Level 1 shoals
Supply 1000 · 45s minigame
Spudscale ShoalLevel 1 · base Spudscale · 10 catches
Spudscale (base)82.37%
Tunato15%
Crystal Koi1.5%
Codfather0.01%
Wooden Accessory Chest0.15%
Wooden Armor Chest0.15%
Wooden Weapon Chest0.15%
Small Pouch0.5%
Medium Pouch0.15%
Large Pouch0.01%
Taterfin ShoalLevel 1 · base Taterfin · 10 catches
Taterfin (base)82.37%
Pawranha15%
Axoma Lurker1.5%
Codfather0.01%
Wooden Accessory Chest0.15%
Wooden Armor Chest0.15%
Wooden Weapon Chest0.15%
Small Pouch0.5%
Medium Pouch0.15%
Large Pouch0.01%
Level 2 shoals
Supply 500 · 30s minigame · Fish moves more erratically; Smaller catch bracket; Catch bar fills slower and drains faster
Hashibut ShoalLevel 2 · base Hashibut · 8 catches
Hashibut (base)82.86%
Whiskarp15%
Mash Marlin1.5%
Trouticus0.01%
Medium Pouch0.3%
Orb of Reforging0.2%
Orb of Refinement0.1%
Large Pouch0.03%
Minigame
Tension Bar (left)
Line stress — don't hit 100% or drop to 0%.
Fish Track (center)
Fish moves unpredictably; overlap it to fill the Catch bar.
Catch Bar (right)
Reach 100% before time runs out to succeed.
Hold to reel in (raises tension and moves your bracket up); release for slack. Keep the bracket on the fish to fill the Catch bar — if you miss, the bar drains. Level 1 shoals allow 45s; level 2 shoals allow 30s.
Tension (left), fish track (center), catch bar (right).
Tips & higher levels
Higher-tier rods don't lock shoals, but faster catch rate makes high-level shoals practical.
Watch tension as much as the catch bar — letting loose too long loses the fish.
Rare loot chance (non-base fish) uses effective = base × (1 + LCK ÷ 100) — e.g. 1.5% at 1 LCK → 1.515%. Bait can target specific fish.
Level 2 shoals (e.g. Hashibut) are rarer, have 500 supply, harder minigame (30s, smaller bracket, slower fill / faster drain) and grant Shoalkeepers Reputation. Hashibut cooks into Fried Hashibut (+3 Vitality for 24 hours).